
ideal logic combi timer instructions
Ideal Logic Combi Timer Instructions: A Comprehensive Guide
Navigating your Ideal Logic Combi boiler’s timer requires understanding its settings—I, O, and Clock—and potential issues like ‘Room Stat Off’ errors.
Understanding the Logic Combi Boiler System
The Ideal Logic Combi boiler system is a highly efficient heating solution, but optimal performance relies on a correctly functioning timer. These boilers utilize a sophisticated control system, often incorporating features like OpenTherm technology for enhanced communication with thermostats. Understanding the interplay between the boiler, the timer module, and the thermostat is crucial for effective operation and troubleshooting.
The timer dictates when the boiler provides heating and hot water, offering programmable schedules to suit lifestyle needs. Common issues stem from incorrect timer settings (I, O, Clock modes), signal disruptions between the thermostat and boiler, or faults within the boiler’s Printed Circuit Board (PCB). A key component is the receiver unit, responsible for relaying signals. Proper wiring, particularly with OpenTherm’s purple wires, is essential.
Furthermore, recognizing the boiler’s identification and components aids in targeted troubleshooting. Resetting the burner control or performing a complete timer reset (with caution!) can resolve temporary glitches. A stable power supply, whether via a standard plug or dedicated wiring, is also paramount.
Identifying Common Timer Issues
Several issues can plague the Ideal Logic Combi timer, disrupting heating schedules. A frequent problem is the “Room Stat Off” error, even when the thermostat appears to be communicating correctly. This often points to signal interference or wiring faults within the receiver unit, or potentially low thermostat batteries. Inspecting the PCB for error codes is vital, as these provide specific fault diagnoses.
Another common issue arises from incorrect timer settings. Users may inadvertently set the timer to ‘O’ (Off) instead of ‘Clock’ (Timer mode) or ‘I’ (Constant running). Wiring problems, especially when integrating smart thermostats like Tado, can also cause malfunctions. Ensure all connections between the boiler and thermostat are secure and correctly configured.
Power supply inconsistencies can also trigger timer errors. Finally, a faulty motorized valve controlling central heating can prevent the system from responding to timer commands. Regular checks and resets can often resolve these issues.
Room Stat Off Error: Troubleshooting
The “Room Stat Off” error on an Ideal Logic Combi boiler, despite thermostat communication, demands systematic troubleshooting. Begin by meticulously checking the receiver unit for signal disruptions or loose wiring connections. Confirm the thermostat has fresh batteries and is correctly configured to communicate with the boiler.
Next, examine the boiler’s PCB (Printed Circuit Board) for specific error codes. These codes pinpoint the source of the fault, guiding further investigation. Verify the motorized valve responsible for central heating operation is functioning correctly; a faulty valve can mimic a thermostat issue.

A simple boiler reset can often clear temporary faults triggering the error. If the problem persists, carefully inspect the Opentherm wiring, particularly the purple wires, ensuring correct harness configuration. Remember to consult the boiler’s manual for specific error code definitions and reset procedures.
Thermostat Communication Checks
Ensuring seamless communication between your Ideal Logic Combi boiler and thermostat is crucial when troubleshooting a “Room Stat Off” error. Start by verifying the thermostat’s batteries are fully charged, as low power can disrupt the signal. Confirm the thermostat is set to the correct operating mode – heating, not hot water only – and that the desired temperature is set appropriately.
Check for any physical obstructions blocking the wireless signal, if applicable. For wired thermostats, inspect the wiring connections at both the thermostat and the boiler receiver unit, ensuring they are secure and free from corrosion. A multimeter can be used to test continuity along the wiring.
If using a smart thermostat like Tado, confirm its integration with the boiler is still active and that the Tado app displays correct communication status. Review the thermostat’s settings within the boiler’s interface, if accessible.
Receiver Unit Signal & Wiring Inspection
The receiver unit, often located within the boiler’s casing, is vital for translating thermostat signals. Begin by visually inspecting the unit for any signs of damage, such as burnt components or loose connections. Carefully check all wiring connected to the receiver, ensuring each wire is firmly secured in its terminal and free from corrosion.
Pay close attention to the wiring connecting the receiver to the boiler’s PCB (Printed Circuit Board). Verify these connections match the wiring diagram specific to your Ideal Logic Combi model. If you’ve recently installed a smart thermostat like Tado, double-check the wiring between the boiler and the Tado receiver, as incorrect wiring is a common issue.
Use a multimeter to test the voltage at the receiver unit’s terminals, confirming it’s receiving power. A weak or absent signal could indicate a faulty receiver unit requiring replacement.
PCB Error Codes & Faults
The Ideal Logic Combi boiler’s Printed Circuit Board (PCB) stores error codes that pinpoint potential issues. When a ‘Room Stat Off’ error appears despite thermostat communication, the PCB is the next area to investigate. Accessing these codes usually involves a specific button sequence on the boiler’s control panel – consult your boiler’s manual for the exact procedure.
Common PCB faults include component failure, corrosion due to condensation, or software glitches. Error codes related to the thermostat connection or heating control module are particularly relevant. Note down any displayed error codes as they provide crucial diagnostic information.
If you identify an error code, research its meaning in the boiler’s documentation or online resources. Some codes may indicate a simple reset is sufficient, while others suggest a more serious PCB fault requiring professional repair or replacement. Caution: PCB repairs should only be undertaken by qualified heating engineers.
Resetting the Ideal Logic Combi Timer
Resetting the Ideal Logic Combi timer can resolve minor operational glitches and restore functionality. Begin by locating the reset button, typically a small, recessed button on the timer module itself. It often requires a pointed object, like a pen or pencil, to depress it. A brief press – around one second – is usually sufficient to initiate a reset of the burner control, as indicated by holding down the lockout reset button.
Caution: A complete timer reset, achieved by holding the reset button for a longer duration, will erase all programmed settings, returning the timer to its factory defaults. This means you’ll need to re-enter your desired heating schedules. Before performing a full reset, ensure you have a record of your previous settings.
After resetting, allow the boiler a few minutes to restart and recalibrate. Verify that the timer is now functioning correctly by checking the display and attempting to activate a heating cycle.
Locating the Reset Button
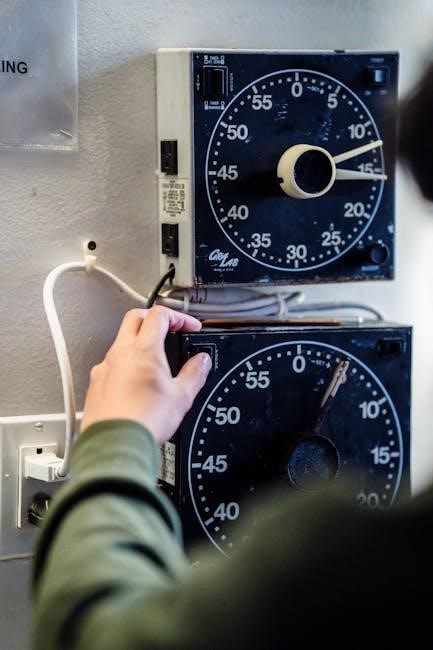
Finding the reset button on your Ideal Logic Combi timer is the first step towards resolving operational issues. The button’s location can vary slightly depending on the specific model, but it’s generally situated on the timer module itself. Look for a small, often recessed, button – it’s designed to prevent accidental presses.
Typically, the reset button isn’t prominently labeled; it may require careful inspection. It’s often found on the front or side of the timer unit, sometimes concealed behind a small panel. You’ll likely need a pointed object, such as a pen tip, pencil, or a small screwdriver, to access and depress the button, as it’s usually flush or slightly sunken into the casing.
Consult your boiler’s manual for a precise diagram illustrating the reset button’s location for your particular model. A visual guide will significantly simplify the process.
Performing a Complete Timer Reset (Caution!)
Caution: A complete timer reset will erase all previously programmed settings, returning the timer to its factory default state. This means you’ll need to re-enter your desired heating schedules and preferences. Proceed only if other troubleshooting steps have failed.
To perform the reset, locate the reset button (as described previously) and use a pointed object to gently press and hold it. Hold the button down for approximately one second – avoid exceeding three seconds. Releasing the button initiates the reset process.
The boiler may briefly cycle or display a message indicating the reset is in progress. Once complete, the timer display will likely revert to a default time or a flashing prompt, signaling that reprogramming is required. Carefully follow the timer’s programming instructions in your boiler manual to restore your preferred heating schedule. Remember to document your settings beforehand to simplify the re-programming process.
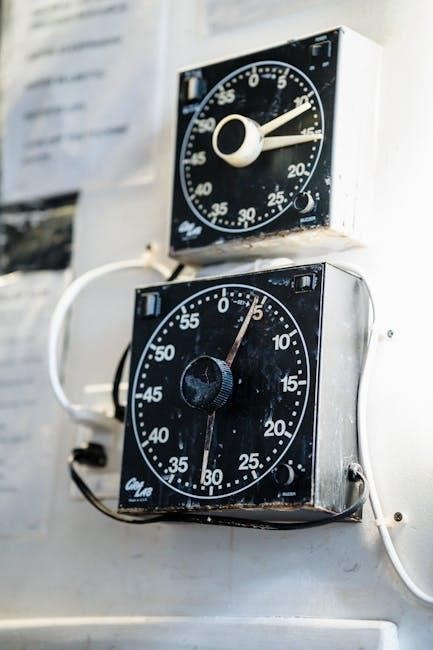
Timer Settings: I, O, and Clock Modes

The analog clocks on Ideal Logic Combi boilers feature three distinct settings: I, O, and Clock. Understanding these modes is crucial for effective timer operation and heating control.
The ‘I’ setting signifies constant running mode. When selected, the boiler will operate continuously, providing heat regardless of programmed schedules. This is useful for maintaining a consistent temperature during extended cold periods or when immediate heating is required.
Conversely, the ‘O’ setting represents the ‘off’ position. Selecting ‘O’ disables the timer function, and the boiler will not operate unless manually overridden. This mode is ideal for periods when heating is entirely unnecessary, such as during warmer months.
Finally, the ‘Clock’ setting activates the timer’s programmed schedule. The boiler will automatically switch between heating and off states based on the times and days you’ve configured, offering efficient and convenient heating control.
Thermostat Adjustment for Timer Functionality
Optimal performance of your Ideal Logic Combi boiler’s timer relies heavily on correct thermostat settings. Ensure your thermostat batteries are sufficiently charged, as low power can disrupt communication and override timer schedules.
When troubleshooting, try increasing the thermostat’s setpoint temperature. This can help determine if the boiler is receiving a call for heat from the thermostat, confirming proper signal transmission. If raising the temperature resolves the issue, the original setting may have been too low for reliable operation.
Verify the thermostat’s mode is set appropriately – typically ‘Auto’ for timer-controlled heating. Avoid ‘Off’ or ‘Manual’ modes if you intend to utilize the programmed schedules. Regularly check thermostat settings to ensure they align with your desired comfort levels and energy-saving goals.
Proper thermostat adjustment is key to unlocking the full potential of your boiler’s timer functionality, ensuring consistent and efficient heating.
Burner Control Reset Procedure
If your Ideal Logic Combi boiler experiences a lockout, a burner control reset may be necessary to restore functionality. Locate the lockout reset button, typically found on the boiler’s front panel or within the control unit. Access may require removing a cover panel – consult your boiler’s manual for specific instructions.
To initiate the reset, firmly press and hold the lockout reset button for approximately one second, but crucially, for less than three seconds. A prolonged press could trigger unintended consequences. This action attempts to clear temporary faults that may be preventing the burner from igniting.
Following the reset, the boiler will attempt to restart its ignition sequence. Observe for any error codes displayed on the boiler’s interface. If the boiler fails to restart or continues to display error codes, further investigation and professional assistance are recommended. Repeated lockouts indicate an underlying issue requiring diagnosis.
Lockout Reset Button Operation
The lockout reset button on your Ideal Logic Combi boiler is a crucial component for resolving ignition failures. It’s designed to clear temporary faults that cause the burner to shut down as a safety precaution. Typically, this button is small and recessed, requiring a pointed object – like a pen or pencil – for activation. Avoid using metal objects to prevent potential damage.
To operate the button, apply firm, but gentle, pressure and hold for roughly one second. Crucially, do not hold it for longer than three seconds. An extended press can inadvertently trigger other boiler functions or potentially cause further issues.
After releasing the button, the boiler will initiate a restart sequence. Pay close attention to the display panel for any error codes. If the boiler doesn’t restart or the lockout recurs frequently, it signals a more significant problem needing professional attention. Repeated lockouts aren’t a fix, but a symptom.
Power Supply Considerations
Understanding your Ideal Logic Combi boiler’s power supply is vital for correct operation. Many models utilize a standard plug-in power setup, directly connecting to a mains socket. However, some installations feature a separate, two-wire power connection, bypassing a traditional plug. Always verify the power source matches your boiler’s specifications.
For boilers incorporating Opentherm technology, a specific wiring configuration is essential. This often involves purple wires within a dedicated harness. Correctly configuring this harness ensures seamless communication between the boiler and compatible smart thermostats, like Tado. Incorrect wiring can lead to timer malfunctions and heating inconsistencies.
If you’ve recently installed a smart thermostat, carefully inspect the wiring between the boiler and the thermostat unit. Issues here are a common cause of timer-related problems. Ensure all connections are secure and follow the manufacturer’s wiring diagrams precisely.
Standard Plug-in Power Setup
If your Ideal Logic Combi boiler utilizes a standard plug-in power setup, ensuring a stable power supply is paramount for reliable timer operation. The boiler simply connects to a standard UK three-pin socket. Verify the socket is functioning correctly by testing it with another appliance.
Avoid using extension leads if possible, as they can sometimes introduce voltage drops or instability, potentially affecting the timer’s accuracy. If an extension lead is unavoidable, ensure it’s rated for the boiler’s power consumption and is in good condition.
Periodically check the plug for any signs of damage or overheating. A loose connection or damaged plug can interrupt power to the boiler, causing the timer to reset or malfunction. Never attempt to repair a damaged plug yourself; consult a qualified electrician.
Consistent power is crucial for maintaining the timer’s programmed settings and preventing unexpected interruptions to your heating schedule.
Opentherm Wiring & Harness Configuration (Purple Wires)
When integrating smart thermostats like Tado with your Ideal Logic Combi boiler using Opentherm, the purple wires are critical for communication. A dedicated Opentherm harness is often required, facilitating the digital signal exchange between the boiler and thermostat.

Incorrect wiring of these purple wires can lead to communication errors, manifesting as ‘Room Stat Off’ errors or inconsistent heating behavior. Ensure the harness is correctly connected to the designated Opentherm terminals on both the boiler’s PCB and the thermostat.
Double-check the wiring diagram specific to your boiler model and thermostat. Some configurations may require a specific wiring order or the use of a link cable. If a harness wasn’t included, verify compatibility before purchasing one.

Troubleshooting often involves inspecting these connections for looseness or corrosion. A secure and clean connection is vital for reliable Opentherm communication.
Timer Module Installation & Wiring
Proper installation and wiring of the timer module are crucial for seamless operation of your Ideal Logic Combi boiler’s timing functions. If the system previously functioned without a module, a wiring issue between the boiler and a newly installed smart thermostat (like Tado) is highly probable.
Carefully examine the wiring connections, ensuring they align with the boiler’s wiring diagram. Incorrect connections can disrupt communication and trigger error codes. Pay close attention to the live and neutral wires, as well as any earth connections for safety.
Verify that all connections are secure and free from corrosion. Loose wires can cause intermittent faults. If unsure, consult a qualified heating engineer to ensure correct installation and prevent potential damage.
Double-check compatibility between the timer module and your specific boiler model. Using an incompatible module can lead to malfunctions and void the warranty.

Troubleshooting Wiring Between Boiler & Smart Thermostats (e.g., Tado)
When integrating a smart thermostat like Tado with your Ideal Logic Combi boiler, wiring discrepancies are a common source of issues. Begin by meticulously verifying the wiring connections between the boiler and the thermostat base. Ensure each wire is securely connected to the correct terminal, referencing both the boiler’s wiring diagram and the Tado installation guide.
Specifically, check the live, neutral, and earth connections. A loose or incorrectly connected wire can disrupt communication. If your setup includes Opentherm technology, carefully inspect the purple wires, ensuring they are correctly configured and connected to the appropriate terminals on both the boiler and the Tado receiver unit.
Consider the possibility of a missing or damaged wiring harness. A faulty harness can prevent proper signal transmission. If problems persist, temporarily bypass the smart thermostat to see if the boiler functions correctly, indicating a thermostat-related issue.
Key Terminology: Timer & Timing
Understanding specific terms is crucial when dealing with your Ideal Logic Combi boiler’s timer functions. A timer refers to the device or system controlling when the boiler operates, scheduling heating periods. Timing describes the precise setting of these operational periods – the start and end times for heating.
The ‘I’ setting on analog clocks signifies constant operation, meaning the boiler runs continuously, overriding scheduled timings. Conversely, ‘O’ indicates the system is entirely off, ignoring any programmed schedules. The ‘Clock’ setting activates the programmed timer schedule, allowing for automated heating control.
A lockout situation occurs when the burner fails to ignite after multiple attempts, requiring a reset. A PCB (Printed Circuit Board) is the boiler’s central control unit, potentially displaying error codes indicating specific faults. Finally, Opentherm is a communication protocol enabling smart thermostats to efficiently manage heating systems.
Ideal Logic Boiler Identification & Components
The Ideal Logic Combi boiler range encompasses various models, each sharing core components vital for timer functionality. Identifying your specific model is the first step; look for the model number on the boiler’s casing; Key components include the timer module itself, responsible for scheduling, and the PCB (Printed Circuit Board), the central processing unit.
The receiver unit plays a crucial role in communication, particularly with thermostats. Opentherm wiring, often utilizing purple wires, facilitates advanced control with compatible smart thermostats like Tado. The burner control manages ignition and operation, featuring a lockout reset button for resolving ignition failures.

Furthermore, the motorized valve regulates hot water flow to radiators. Understanding these components – and their interconnections – is essential for troubleshooting timer-related issues. Proper power supply, whether via a standard plug or dedicated wiring, is also fundamental for reliable operation.